As a cybersecurity enthusiast who’s spent countless hours tinkering with tools in virtual labs, I’ve come across a lot of command-and-control (C2) frameworks. But few have caught my attention like Havoc, an open-source, modern, and highly malleable C2 framework that’s become a favorite among red teamers and penetration testers. Created by Paul Ungur (aka @C5pider), Havoc stands out for its flexibility, user-friendly interface, and ability to adapt to complex attack scenarios. In this blog post, I’ll dive into what Havoc is, its purpose, how it’s used, and some practical examples to show it in action. Whether you’re a red teamer, blue teamer, or just curious about offensive security, let’s explore why Havoc is making waves in 2025.
What is the Havoc C2 Framework?

Havoc is a post-exploitation command-and-control framework designed for penetration testing, red team engagements, and adversary emulation. Written in Golang, C++, C, and ASM with a Qt-based user interface, it’s a powerful tool for managing compromised systems remotely. Havoc is still under active development and has quickly gained traction as an open-source alternative to commercial frameworks like Cobalt Strike.
Havoc’s architecture splits into two main components:
-
Teamserver: The backend that handles listener management, payload generation, and agent tasking. It runs on a server (often a VPS) and communicates with agents (called “Demons”) on compromised systems.
-
Client: A sleek, GUI-driven interface (using the Dracula theme) where operators manage sessions, execute commands, and view outputs like screenshots or stolen files (termed “loot”).
Havoc’s primary agent, the Demon, is written in C/ASM and supports x64 Windows executables, DLLs, and shellcode. It uses protocols like HTTP/HTTPS and SMB for communication, with advanced features like indirect syscalls and sleep obfuscation to evade detection by antivirus (AV) and endpoint detection and response (EDR) systems.
Purpose of Havoc
Havoc’s core purpose is to provide a flexible, modular platform for post-exploitation tasks during security assessments. It’s built for:
-
Red Team Engagements: Simulating real-world cyberattacks to test an organization’s defenses, mimicking advanced persistent threats (APTs).
-
Penetration Testing: Controlling compromised systems to identify vulnerabilities, escalate privileges, or pivot within a network.
-
Adversary Emulation: Replicating tactics, techniques, and procedures (TTPs) of real threat actors to help blue teams improve detection and response.
-
Blue Team Training: Familiarizing defenders with C2 behaviors to better detect and mitigate attacks.
Unlike some frameworks designed for stealth, Havoc prioritizes malleability over evasion, allowing operators to customize payloads and modules to suit specific environments. This makes it ideal for tailored attacks but also means default payloads may require tweaks to bypass modern AV/EDR solutions.
Why Havoc Stands Out
Havoc’s popularity stems from its blend of usability and power:
-
Modularity: Operators can extend functionality with custom modules, Beacon Object Files (BOFs), and scripts. For example, community extensions like
havoc-privkitintegrate privilege escalation tools, whilehavoc-bloodhoundstreamlines Active Directory analysis. -
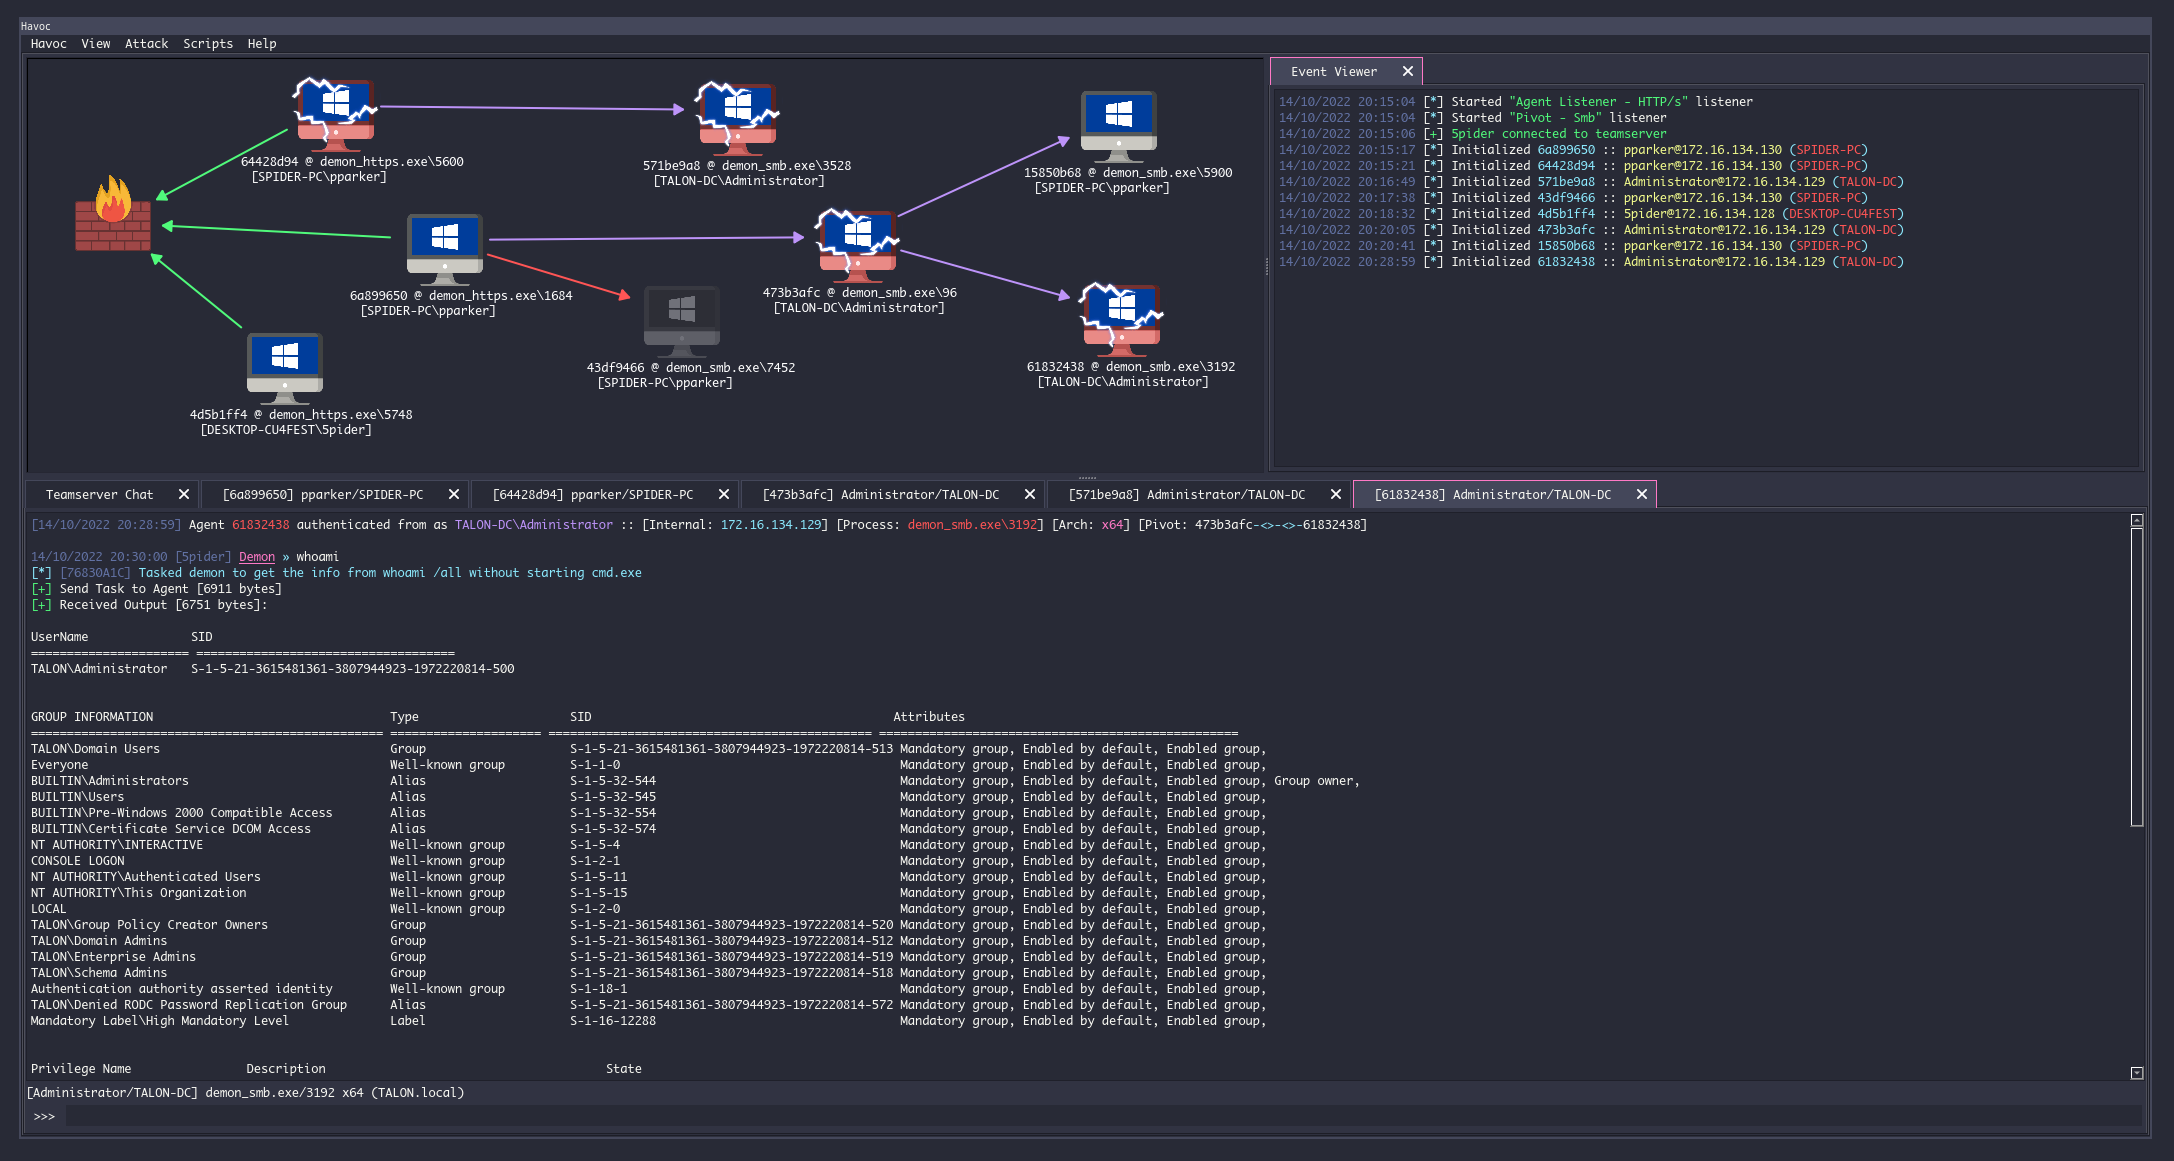
User-Friendly Interface: The Qt-based GUI, with its graph and table views for sessions, event viewer, and loot tab, makes managing multiple compromised systems intuitive.
-
Evasion Techniques: Features like indirect syscalls and sleep obfuscation help Demons avoid detection, though operators may need to disable AV for testing (as I did in my lab).
-
Open-Source and Free: Available on GitHub, Havoc is accessible to anyone, fostering a vibrant community of contributors.
-
Multi-Platform Support: It runs smoothly on Debian 10/11, Ubuntu 20.04/22.04, and Kali Linux, with clear installation guides.
Setting Up Havoc: A Quick Overview
Before diving into examples, let’s cover basic setup (based on my experience in a Kali Linux lab). For detailed steps, check Havoc’s official documentation at havocframework.com or GitHub.
- Install Dependencies: On Kali Linux, ensure you have Golang 1.18+, Python 3.10, Qt, and build tools like
make. For Ubuntu, you may need thedeadsnakesPPA for Python 3.10.
sudo apt update
sudo apt install python3.10 python3.10-dev build-essential
- Clone the Repository:
git clone https://github.com/HavocFramework/Havoc.git
cd Havoc
- Build the Teamserver and Client:
make ts-build  # Build teamserver
make client-build  # Build client
- Run the Teamserver:
./havoc server --profile ./profiles/havoc.yaotl -v
- Launch the Client:
./havoc client
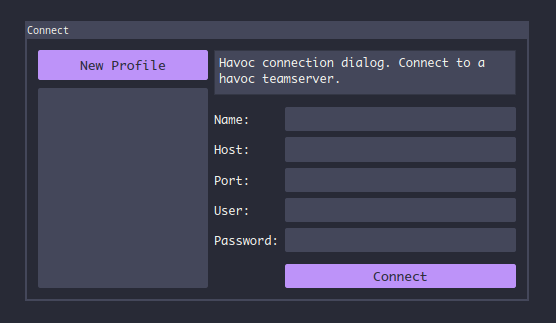
- Enter the teamserver’s IP, port, and credentials to connect.
Note: I ran both teamserver and client on the same Kali machine for simplicity, but in real engagements, the teamserver should be on a VPS for accessibility.
Practical Examples of Havoc in Action
To show Havoc’s capabilities, I set up a lab with a Kali Linux host (running Havoc) and a Windows 10 target (with Windows Defender disabled for testing, as default payloads may be detected). Here are three examples of using Havoc for post-exploitation tasks.
Example 1: Creating a Listener and Payload
Listeners are the backbone of any C2 framework, waiting for callbacks from compromised systems. To create one:
In the Havoc client, go to View > Listeners.
Click Add, name the listener (e.g., “Demon1”), select HTTPS as the protocol, and set the host (e.g., your Kali IP) and port (e.g., 443). Save it.
Generate a payload: Go to Attack > Payload, select the listener, choose Windows Exe for x64 architecture, and click Generate. Save the payload (e.g., demon.exe).
I transferred demon.exe to the Windows target via a shared folder and executed it. Within seconds, the Havoc client showed a new session in the session table, displaying the user (mylab\user1), computer (DESKTOP-TEST), and domain (mylab.local).
Example 2: Executing Commands
Once a session is active, you can interact with it:
Right-click the session in the Havoc client and select Interact.
In the command tab, type whoami to confirm the user context (e.g., mylab\user1 with medium integrity).
Run shell dir to list the directory contents on the target, or screenshot to capture the desktop. Screenshots appear in the View > Loot tab.
In my lab, running shell systeminfo returned detailed system info, including OS version and installed patches, which is useful for planning privilege escalation.
Example 3: Privilege Escalation with BOFs
Havoc supports Beacon Object Files (BOFs), lightweight code snippets for post-exploitation tasks. To escalate from a medium-integrity shell to a high-integrity one:
Check if the user is a local admin: Run shell net localgroup administrators. In my lab, mylab\user1 was an admin.
Use a BOF like fodhelper (a community module exploiting a UAC bypass). Load it via Scripts > Script Manager, then execute:
bof fodhelper
This spawned a high-integrity shell, verified by running whoami /priv.
This allowed me to execute commands with elevated privileges, like dumping credentials or accessing restricted files.
Advanced Features and Use Cases
Havoc’s modularity shines in advanced scenarios:
-
Pivoting: Use the SMB listener for lateral movement when direct communication with the teamserver isn’t possible.
-
Custom Modules: Load community modules like
havoc-privkitfor privilege escalation orhavoc-bloodhoundfor Active Directory recon. -
External C2: Connect Havoc to other C2 frameworks via external listeners, enhancing interoperability.
-
.NET Execution: Inject .NET assemblies with
dotnet inline-execute, though be cautious as crashes can kill the session. -
Encrypted Communication: HTTPS listeners ensure traffic is encrypted, reducing detection by network monitoring tools.
In a real engagement, I’d use Havoc to simulate an APT by deploying a Demon via a phishing email, pivoting to a domain controller, and exfiltrating data—all while mapping TTPs to the MITRE ATT&CK framework for reporting.
Challenges and Considerations
Havoc isn’t perfect. Default payloads are often flagged by Windows Defender, requiring custom encryption or obfuscation (which I didn’t cover due to complexity). Installation can be tricky if Python 3.10 or Qt versions are mismatched, so follow the docs closely. Also, while Havoc’s modularity is a strength, it demands technical skill to customize effectively, especially for evasion.
For blue teams, Havoc’s growing use in real attacks (e.g., targeting government organizations in 2023) underscores the need to study its TTPs. Look for indicators like specific certificate names (e.g., “ACME,” “Synergy”) or encrypted HTTPS traffic patterns.
A Personal Take
Setting up Havoc in my lab was a thrill. The clean GUI, reminiscent of Cobalt Strike but free, made managing sessions a breeze. Running screenshot and seeing the target’s desktop pop up in the loot tab felt like unlocking a digital treasure chest. The ability to extend Havoc with BOFs and scripts kept me tinkering for hours, and the community’s active Discord (linked on GitHub) was a goldmine for troubleshooting.
Final Thoughts

The Havoc C2 framework is a game-changer for offensive security. Its open-source nature, modular design, and intuitive interface make it a go-to for red teamers and pentesters. While it requires some technical know-how to maximize its potential, the payoff is worth it—whether you’re simulating a sophisticated attack or training to defend against one. For blue teamers, understanding Havoc’s capabilities is critical as it gains traction among threat actors.
If you’re curious, spin up a lab, install Havoc (take a VM snapshot first!), and play with its features. Check out the GitHub repo or join the Discord community for tips.


